For the end user, working your leads in Open Leads is extremely simple and easy.
When you open the Lead Detail Screen, you see all of the contact information that is available for that lead and any pending Tasks that need to be completed.
Simply click on the green check mark icon next to a Task that is due, and then click “Complete.” The Task is then moved to the History Section for that lead and date and time stamped. A Comment Box also shows so that you can record information related to the completion - such as notes from a phone conversation.
The "Add Comment” function can also be used to record any other pertinent information regarding that task - such as meeting notes or a conversation recap, or even to copy and paste the text of a reply to an email you sent. Once recorded as a comment, you can review the information as a record of contact you have had with that lead at any time.
Based on your progress with the lead, you can schedule additional Tasks, update their status in the Sales Pipeline, or change their type, etc.
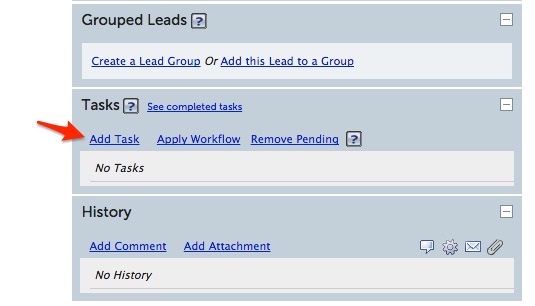
Adding a Task
To add an Task - such as a “Follow-up Call” to a Lead from within the Lead Detail, simply click “Add Task” in the Tasks Box to the right of the screen. When you click this link, you will pop open the Add Task editor.
The minimum you would need to do is give the Task a name and assign it a Task Type - here it is a “Follow up” - and schedule it for a date and time. You can elect to choose a date using the popup calendar feature (click on the calendar icon next to the date field)

or enter a date, date and time, or by using a Smart Date phrase (if you type "Next Tuesday" in the date field, the program will automatically go and fetch the date of next Tuesday, or if you typed "1 week" the program will fetch the date one week in the future). An email reminder can then be scheduled to go at a pre-determined interval, i.e. 15 minutes before the scheduled Task, to the user that is selected for the task (it will default to the logged-in User).
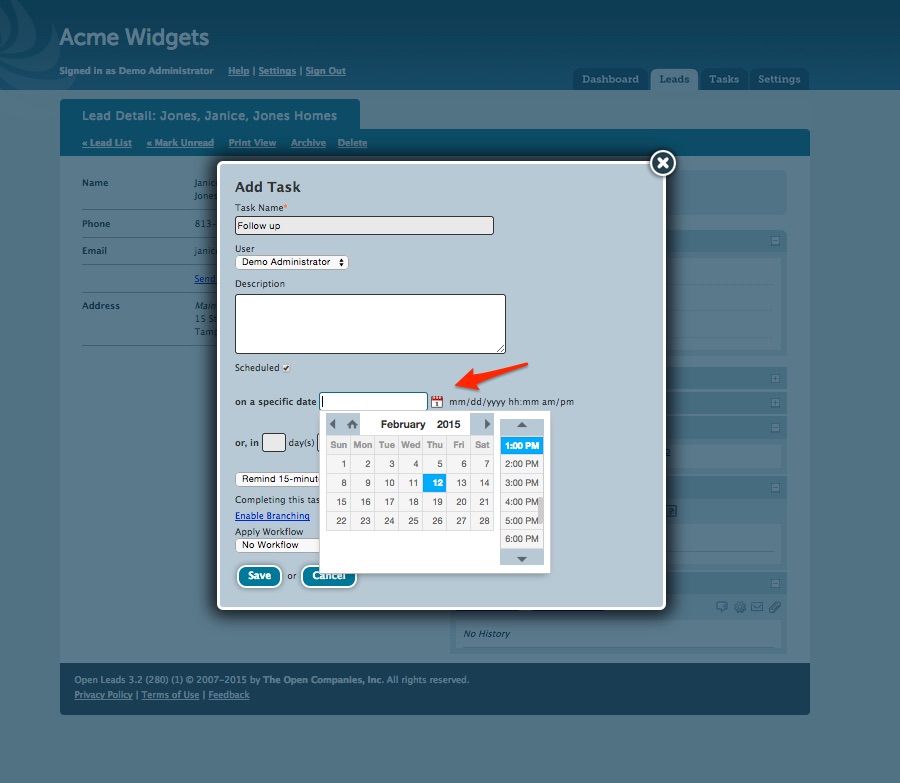
Click "Save," and the Task will be scheduled.
All new tasks created in Open Leads can now be assigned to a user, whereas previous versions had Tasks inheriting the user(s) assigned to the Lead. When adding a new task, simply choose the user you wish to assign to that task from the dropdown list. This defaults to the user logged in, but gives the added flexibilty to assign a specific task to any of your available users.
Advanced users may elect to enable branching. Branching allows you to trigger two distinct workflows based on a branching question - for example “Did prospect buy?” A “Yes” response would trigger a “Sold” workflow, while a “No” would result in a “No Sale” workflow being applied to the lead.
Lead Grouping
Lead Grouping serves to help organize related lead data. For your purposes, you will want to group leads that belong to the same organization, such as several contacts for the same company. Primary, or “parent” Leads are indicated by the red and gray sphere symbol, and Secondary or “child” records are indicated by all gray spheres. Once grouped, all comments and history records for the entire group are displayed in all of the individual Lead Detail Screens. Users may toggle back and forth between viewing history for the entire group or just the Lead that they are viewing by clicking on the "Show just this Lead" link inside the history box.
You can also add additional Leads to any of the groups you have set up in your account using forms. Selecting this option pre-populates certain General Contact Fields with data, reducing duplication, and automatically grouping the information with the parent lead.
Grouped Leads can be easily distinguished on the Lead List and are easily found by using the filter system to create a View on the lead list. For example you can show only Grouped Leads, or only Ungrouped Leads, or only Primary leads, reducing clutter on your lead list.
Email
Any user can send single emails out of the system. Depending on the version of Open Leads you use, users can send up to 15000 mass email messages per month to segments of their lead list.
In addition, Open Leads Email allows users to insert “Tokens” in the body of their message. Tokens retrieve data from your Lead record and places that data in the message text. For example, your Account Administrator may have created a message for use as a Template for a single or mass email that uses these Tokens. Starting the message with “Dear [First],” causes the message that the Lead would receive would be addressed to them by their First Name as it is recorded in their lead record. This is an extremely valuable tool in terms of lead deliverability and read-rates. Your account generates Tokens for every Field in your account, and a list of the available Tokens for your account are displayed to the right of your screen in the Send Email screen. When composing an email, you can simply copy and paste the tokens as needed into the body of your message.
NOTE: Tokens are NOW supported in the Subject Line of your email messages.
Also, be aware that all email sent out of Open Leads is CAN-SPAM compliant and has an generic opt-out message as required by Federal Law. You can, however, elect to create a custom message to go with the opt-out message. This option also uses the Token system. Simply compose your phrase at the end of your message, such as: “If you no longer wish to receive mail from me, click here: [unsubscribe]” - you can customize this in any manner you wish, as long as you include the Unsubscribe Token.
For more information on composing and sending email to your leads, see the section on Mass Email in Advanced Features.
The Task Tab
The Task Tab consists of two elements, the Calendar and the Tasks List. Some users elect to work their leads from this Tab as well as from the Leads Tab. Viewing this tab shows you all Tasks scheduled for the current day. On the calendar, today’s date is outlined in red for easy visual identification. Dates with Tasks scheduled are displayed in bold.
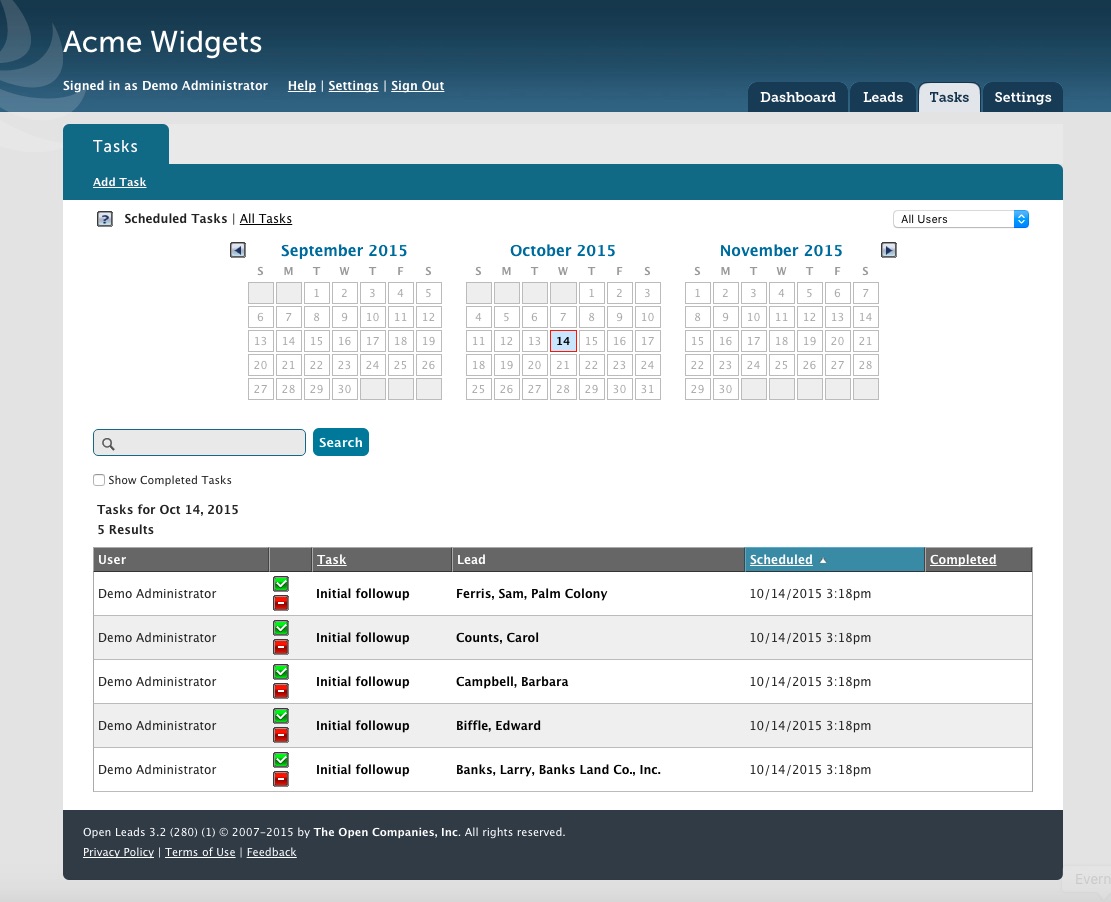
Complete Tasks by clicking on the green “Checkmark” icon, or click on the lead name to be taken to the lead detail for that record.
You may move forward and backward in the calendar and click on any day to view the Tasks, both active and completed for that day. You may also select a date range within the calendar by clicking on the beginning date, and then Shift+Click on the end date. Your Task List is then updated for the selected date range.
Your Task List consists of columns showing the User Assignment, Task Name, Lead that the Task is associated with, and both the Scheduled Date and the Completed Date. You may use the search box to find specific tasks by name, lead name, etc. that are displayed in those columns. To complete any of the Tasks, simply click on the Task Name or the Lead Name, to be taken to the Lead Detail screen, where you may complete the task, edit it or add additional tasks for that lead. Toggle between your scheduled tasks and all of your tasks by clicking on the “All Tasks” link in the top. This is useful to see all of your tasks “at-a-glance.”
“Subscribe to iCalendar Feed” and “View in 30 Boxes” Options.
Your Open Leads Task list is now available as an iCal feed. Clicking on this link will open your default iCalendar-compatible application, such as Microsoft Outlook and Apple iCal, and you can then subscribe to your Open Leads Tasks, and display them on your default calendar. The iCalendar feed only shows Active (uncompleted) tasks and only goes back 30 days. You should use your Tasks Tab inside Open Leads if you need to explore a longer range.
For those who prefer a web-based solution, clicking on the “View in 30 Boxes” will cause your iCalendar feed to be displayed in a 30Boxes.com read-only calendar – offering a quick view in a full-calendar mode.
Users also have the ability to create a Task which is not attached to a Lead. This gives a user the ability to schedule a task inside Open Leads for non-lead related tasks – an example would be a Doctor’s Appointment. Scheduling these tasks adds them to your Task List and also includes them in your iCal and 30 Boxes Feeds
** NOTE: Both the iCal and 30 Boxes features are for individually assigned tasks. Account Administrators, by default, have “All Users” as their initial screen, so that they may see all of the leads for their entire account. Admins should switch to the view for their User Account (switch users in the dropdown to the right of the calandar) to subscribe to their iCal feed, or to view their Tasks in 30 Boxes. The links for these features appear in the blue header bar on the Tasks List.
Tasks Tab Functions:
Add Task – Add a new task directly from the Task Tab. Click on the “Add Task” link in the blue header bar, and then enter the new task. If a Task is to be assigned to a specific lead, click on “Attach a Lead to this Task” and then search and select the appropriate lead. You can also elect to assign a user, or no users to this Task, and schedule it or leave the Task open-ended. Newly assigned tasks will show up on the assigned users Task Tab instantly.
Complete or Delete Task – Users can elect to complete or delete any Tasks directly from the Task List. Click the green checkbox icon to complete the task and enter a comment, or click the red icon to delete the Task.
Edit a Task – Click on the task name on the Task List to open the editor – and from there, change the name of the task, the user, or the scheduled date and/or time.
Access the Lead Detail – If your Task is to call or email a Lead, for example, simply click the Lead Name from your Task List to be taken directly to the Lead Detail. This is where you will find all of your up to date contact information for that lead. You can complete the Task from there.